ブラウザとシェルはWebSocketで非同期に相互に(つまり自分勝手)に通信する。
node.jsでspawnすればシェルと繋がるけど、改行入力で1行入力(readline)っぽくシェルがやってくれると思ってたら、改行しても応答無しstdinストリームを閉じまで入力したコマンドを実行する気配が無かった、BackSpaceもそのまま渡ってしまう・・・
どうやらsshサービスが頑張ってる様だ。
node.jsからシェル起動は諦めて、ssh2サービスに繋ぐことにする。
1.WebSocketサーバーの作成
# mkdir testServer
# cd testServer
# npm init
・・・・・
# npm install ssh2            ※SSH2パッケージ
# npm install ws              ※WebSocketパッケージ
const WebSocket = require('ws');
const { sshTerm } = require('./sshTerm.js');
// SSH接続情報
const sshInfo = {
user : '{SSHのログイン・ユーザ名}',
password : '{SSHのログイン・パスワード}' {または} privateKey: require('fs').readFileSync('/PATH/id_rsa') ,
ipaddress : '{SSHのホストIPアドレス}',
sshport : {SSHのポート番号},
wsport : {WebSocketのポート番号},
httpport : {apacheのポート番号},
httpath : '{urlのパス}',
};
// ポート${sshInfo.wsport}でWebSocketサーバーを作成
const wss = new WebSocket.Server({ port: sshInfo.wsport });
// 案内文
console.log(`ssh ready, URL http://${sshInfo.ipaddress}:${sshInfo.httpport}/${sshInfo.httpath}`);
// WebSocketクライアント(xterm.js)接続時の処理
wss.on('connection', function connection(ws) {
const env = process.env;
console.log('connection WebSocket client.');
const bash = sshTerm(ws, sshInfo);
});passwordかprivateKeyかprivateKeyPathのいづれかを指定できる。
const { Client } = require('ssh2');
// SSH接続を確立
const sshTerm = async (ws, sshInfo) => {
  const commandName = 'bash';
  const conn = new Client();
  conn.on('ready', () => {
    // ssh2接続準備完了
    console.log('Client :: ready');
    // shell対応
    conn.shell((err, stream) => {
      if (err) throw err;
      stream.on('close', () => {
        // エラった時
        if (code !== 0) {
          console.log(`${commandName} process exited with code : ${code}.`);
        } else {
          console.log(`${commandName} process exited.`);
        }
        ws.send(`disconnected.`);
        conn.end();
      }).on('data', (data) => {
        // ssh2からデータが送られた時の処理
        console.log(`${commandName} : ${data}`);
        data = data.toString().replaceAll('\n', '\r\n');
        ws.send(data);
      });
      // WebSocketクライアント(xterm.js)からメッセージ受信時の処理
      ws.on('message', async (message) => {
        console.log('受信したメッセージ: %s', message);
        stream.write(message);
      });
      // WebSocketクライアント(xterm.js)クライアントから切断された時の処理
      ws.on('close', function close() {
        console.log('クライアントとの接続が切断');
        stream.end();
      });
      // Ctrl+Cで止められた時の処理
      process.on('SIGHUP', ()=> {
        console.log('Got SIGHUP. ');
        stream.end();
        console.log('クライアントの接続をパージ');
        ws.close();
     });
     // 以上
    });
  }).connect({
    host: sshInfo.ipaddress,
    port: sshInfo.sshport,
    username: sshInfo.user,
    password: sshInfo.password {または} privateKey: sshInfo.privateKey,
  });
};
exports.sshTerm = sshTerm;- privateKey
- ‘~/.ssh/id_rsa` の様な ‘~’ を使うとopenエラー。
- 代用はprocess.env[‘HOME’]
- ‘~/.ssh/id_rsa` の様な ‘~’ を使うとopenエラー。
- privateKeyPath
- エラってしまう。
testServerプロジェクトの雰囲気
- testServer
- index.html
- sshTerm.js
- node_modules
- ssh2
- ws
- node_modules
ここで、
# node index.jsでサーバー側の準備は終わり。
2.WebSocketクライアントの作成
クライアントはapacheのhtmlの下にtestディレクトリィを作りxtermのアドオン等を追加する。
# cd /var/www/html
# mkdir test
# cd test
# npm init
・・・
# npm install @xterm/xterm
# npm install @xterm/addon-web-links
# npm install @xterm/addon-attach
# npm install @xterm/addon-clipboard
# npm install @xterm/addon-fit
# npm install @xterm/addon-image
# npm install @xterm/addon-web-links
# npm install @xterm/addon-webgl
必要なのは、node_modules/@xterm下の cssファイル、jsファイル、mapファイルだけなので不要なファイルは削除する。
index.htmlにアドオンのファイルを追記。
<!doctype html>
  <html lang="ja">
    <meta charset="UTF-8">
    <title>xterm.js test page</title>
    <head>
      <link rel="stylesheet" href="node_modules/@xterm/xterm/css/xterm.css" />
      <script src="node_modules/@xterm/xterm/lib/xterm.js"></script>
      <script src="node_modules/@xterm/addon-web-links/lib/addon-web-links.js"></script>
      <script src="node_modules/@xterm/addon-attach/lib/addon-attach.js"></script>
      <script src="node_modules/@xterm/addon-clipboard/lib/addon-clipboard.js"></script>
      <script src="node_modules/@xterm/addon-fit/lib/addon-fit.js"></script>
      <script src="node_modules/@xterm/addon-image/lib/addon-image.js"></script>
      <script src="node_modules/@xterm/addon-web-links/lib/addon-web-links.js"></script>
      <script src="node_modules/@xterm/addon-webgl/lib/addon-webgl.js"></script>
      <script src="test.js"></script>
    </head>
    <body>
      <div id="terminal"></div>
    </body>
  </html>
test.jsにもアドオンの初期化等を追記
// 初期化処理
const sshInfo = {
wsport    : {WebSocketのポート番号},
};
window.addEventListener('load', () => {
  const term = new Terminal();
  //
  term.open(document.getElementById('terminal'));
  term.write('Hello from \x1B[1;3;31mxterm.js\x1B[0m $ ');
  // addon
  // @xterm/addon-attach
  // initialization
  const webSocket = new WebSocket(`ws://${location.hostname}:${sshInfo.wsport}`);
  const attachAddon = new AttachAddon.AttachAddon(webSocket);
  term.loadAddon(attachAddon);
  // @xterm/addon-clipboard
  // initialization
  const clipboardAddon = new ClipboardAddon.ClipboardAddon();
  term.loadAddon(clipboardAddon);
  // @xterm/addon-fit
  // initialization
  const fitAddon = new FitAddon.FitAddon();
  term.loadAddon(fitAddon);
  fitAddon.fit();
  // @xterm/addon-image
  // customize as needed (showing addon defaults)
  const customSettings = {
    enableSizeReports: true,    // whether to enable CSI t reports (see below)
    pixelLimit: 16777216,       // max. pixel size of a single image
    sixelSupport: true,         // enable sixel support
    sixelScrolling: true,       // whether to scroll on image output
    sixelPaletteLimit: 256,     // initial sixel palette size
    sixelSizeLimit: 25000000,   // size limit of a single sixel sequence
    storageLimit: 128,          // FIFO storage limit in MB
    showPlaceholder: true,      // whether to show a placeholder for evicted images
    iipSupport: true,           // enable iTerm IIP support
    iipSizeLimit: 20000000      // size limit of a single IIP sequence
  }
  // initialization
  const imageAddon = new ImageAddon.ImageAddon(customSettings);
  term.loadAddon(imageAddon);
  // @xterm/addon-web-links
  term.loadAddon(new WebLinksAddon.WebLinksAddon());
  // @xterm/addon-webgl
  term.loadAddon(new WebglAddon.WebglAddon());
});
new ClipboardAddon.ClipboardAddon()とか変な書き方になってるのは
サンプルソースでは new ClipboardAddon() なので実行するとコンストラクタが無いエラーになる。
ブラウザのJavaScriptではグローバルな宣言は、windowオブジェクトにぶら下がるので、
Chromeの開発ツールの監視でwindow値を見ると ClipboardAddon が見つかる
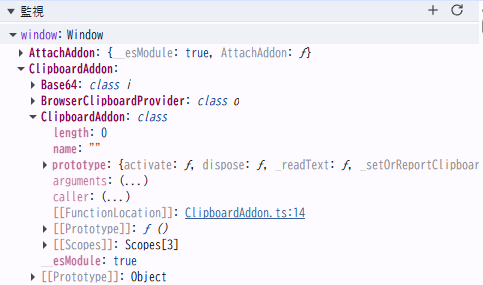
見た感じではClipboardAddon オブジェクトにClipboardAddon クラスがぶら下がっている感じだったのであの様に new している。
多分、TypeScriptのコードをビルドしたソース(というかESModuleコード全般)をJavaScriptから利用するとexportsした名前の下にexportsしたい対象がブラ下がる様に見えるらしい。
/var/www/html/testプロジェクトの雰囲気
- test
- index.html
- test.js
- node_modules
- (いっぱい)
- node_modules
後はブラウザから http://localhost/test/ を開く。
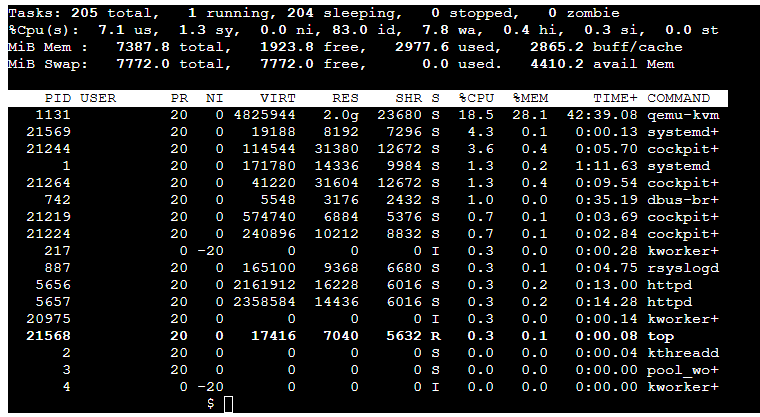
topコマンドやviコマンドも普通に使える。
ブラウザで複数のセッションを開けるけど、多人数で使うのは無理。
とても少ないコードでここまで動くのは大助かり。
もっとも
VisualStudioCodeのSSH接続でソース修正やデバッグができるので
もう不要と云えば不要だけどね。
ps.2025/4/9
アドオンがうまく動作していなかったけど、参考を見て紛れてるミスを訂正したらマウスホバーでリンク表示とかCtrl+クリックでジャンプ出来る様になった。