変奏現実

パソコンやMMORPGのことなどを思いつくまま・・・記載されている会社名・製品名・システム名などは、各社の商標、または登録商標です。

この画面は、簡易表示です

AlmaLinux

[AlmaLinux]wasmerって何?

wasmerは色々な言語のソースコードをWebAssemblyに変換して実行環境を作成し実行してみせるパッケージ。WebAssemblyしか動かない軽量なコンテナっぽいモノは外部とは実行時にパラメータとして与えるCallBackしかなさげなので安全性は高め。

また、jsモジュール化したパッケージがあり、ブラウザで動作するためコンテナっぽいモノはドコでも動く感じ。しかし普通に考えればHTMLにコンテナのソース数分つまり大量の<script>タグを書かないと動かない気もするが、wasmerを利用する自前のJSファイルをESモジュール化し、

<script type="module" src="xxxxx.js">

そのjs1行目にwasmer/sdkをimportすれば、

import { init, Wasmer } from "@wasmer/sdk";

後はwasmer/sdkが必要な分のimportをしてくれるので、ブラウザで容易に動作できそうな感じ。

勿論、直接指示しなくて良くても、大量のアクセスが起きうるので、以降のコードも同期が取れるまで待機する様にawait指示が必須になる。

import { init, Wasmer } from "@wasmer/sdk";
await init();
const pkg = await Wasmer.fromRegistry("python/python");

一応外部とはオフラインでもfromFileで利用可能だが、他プロジェクトへ提供しているパッケージではテストスイートが数GBにもなっているモノもあるのが難

※ パッケージを/path/にダウンロード済みなら
Wasmer.fromFile(/path/);
※も可。

無理と思いつつ、wordpressをwasmerでコンパイルする方法をググってみたが、

WordPressをWasmerでコンパイルするというのは、WordPressの主要な言語であるPHPをWebAssembly(WASM)に変換し、
WasmerというWASMランタイム環境で実行するという意味です。しかし、WordPressの構造がPHPに依存しているため、
WordPress全体をWasmerで動かすことは現実的ではありません。Wasmerは主にC/C++、Rustなどの言語で記述された
コードをWASMに変換し、ブラウザの外でも実行できる環境を提供するもので、WordPressのような動的なウェブアプリ
ケーションを直接コンパイルするような仕組みではありません。

やはり無理っぽいが作ってる人もいるが全部ブラウザ上で動くみたいでプラグイン作成者向けらしい。

ふと、spreadsheet5のscriptタグが多すぎなのに気が付いたのでESモジュール化してHTMLを短くし、CSSや処理中表示もカスタムエレメントに組込んだ。jsスクリプトファイルはネームスペースを圧縮した後だったのでごっそりと圧縮前に戻した。HTMLは短くなるけど、1ファイル毎にしっかりimport/exportしないとエラるので大変で、実行時にエラる時もあるのがとてもメンドイ。数値、文字を入力し計算式も結果が出るからOKかな?

本題に戻りwasmerインストの通りにインストしてみる。

$ curl https://get.wasmer.io -sSfL | sh
/usr/bin/which: no wasmer in (/home/***/.local/bin:/home/***/bin:/usr/local/sbin:/usr/local/bin:/usr/sbin:/usr/bin:/sbin:/bin)
Welcome to the Wasmer bash installer!

               ww
               wwwww
        ww     wwwwww  w
        wwwww      wwwwwwwww
ww      wwwwww  w     wwwwwww
wwwww      wwwwwwwwww   wwwww
wwwwww  w      wwwwwww  wwwww
wwwwwwwwwwwwww   wwwww  wwwww
wwwwwwwwwwwwwww  wwwww  wwwww
wwwwwwwwwwwwwww  wwwww   wwww
wwwwwwwwwwwwwww  wwwww
   wwwwwwwwwwww   wwww
       wwwwwwww
           wwww

downloading: wasmer-linux-amd64
Latest release: v6.0.0
/usr/bin/which: no wasmer in (/home/***/.wasmer/bin)
Downloading archive from https://github.com/wasmerio/wasmer/releases/download/v6.0.0/wasmer-linux-amd64.tar.gz
######################################################################## 100.0%
installing: /home/***/.wasmer
Updating bash profile /home/***/.bashrc
we've added the following to your /home/***/.bashrc
If you have a different profile please add the following:

# Wasmer
export WASMER_DIR="/home/***/.wasmer"
[ -s "$WASMER_DIR/wasmer.sh" ] && source "$WASMER_DIR/wasmer.sh"
check: wasmer 6.0.0 installed successfully ✓
wasmer will be available the next time you open the terminal.
If you want to have the commands available now please execute:

source /home/***/.wasmer/wasmer.sh
$

「すぐ使うなら・・・」と書いてある様に上のsourceコマンドを手打ちすると即使える。

wasmerのtemplatesでserverを検索すると静的WebServerがあったのでインストしてみた。

$ curl --proto '=https' --tlsv1.2 -sSfL https://get.static-web-server.net | sh
info: platform 'x86_64-unknown-linux-gnu' supported
info: downloading the 'static-web-server v2.36.1' pre-compiled binary...
info: installing pre-compiled binary in /usr/local/bin...
Copying SWS pre-compiled binary to /usr/local/bin...
[sudo] password for ***: 
info: pre-compiled binary installed on /usr/local/bin/static-web-server
Version:      2.36.1
Built:        2025-04-01 22:00:32 +00:00
Git commit:   ab44158182e4e29dcece4c3b10068dc596bf9e03
Build target: x86_64-unknown-linux-gnu
Rust version: rustc 1.85.1 (4eb161250 2025-03-15)
License:      MIT OR Apache-2.0
Homepage:     https://static-web-server.net
Author:       Jose Quintana <https://joseluisq.net>
SWS was installed successfully!
To uninstall SWS just remove it from its location.
$
$ static-web-server
Caused by:
    path ./public was not found or inaccessible
$ mkdir public
$ static-web-server
・・・
INFO static_web_server::info: cache control headers: enabled=true
INFO static_web_server::info: security headers: enabled=false
INFO static_web_server::info: http1 server is listening on http://[::]:80
INFO static_web_server::info: press ctrl+c to shut down the server
^C WARN static_web_server::warn: termination signal caught, shutting down the server execution
$ 

デフォルトでは”./public”らしいので、swsの設定ファイルは~/.wasmer/sws/config.tomlに変更し、

# Wasmer config
export WASMER_DIR="/home/***/.wasmer"
export WASMER_CACHE_DIR="$WASMER_DIR/cache"
export PATH="$WASMER_DIR/bin:$PATH"
# for sws
export SERVER_CONFIG_FILE="$WASMER_DIR/sws/config.toml"
# end of wasmer.sh.

その中で、rootフォルダは~/.wasmer/sws/publicに、ポートも8080に変更してみた。

設定のデフォルト値はこちら

[general]

#### Address & Root dir
host = "::"
port = 8080
root = "${WASMER_DIR}/sws/public"

#### Logging
log-level = "error"
・・・

[AlmaLinux]Ninja

wabtのtestスイートのmakeにはPython3が必須。

条件を満たしているのでビルドしてみると

$ make test
which: no emcc in (/home/****/.local/bin:/home/****/bin:/usr/local/sbin:/usr/local/bin:/usr/sbin:/usr/bin:/sbin:/bin)
cd out/clang/Debug/ && cmake -G Ninja /home/****/wabt/ -DCMAKE_C_COMPILER=clang -DCMAKE_CXX_COMPILER=clang++ -DCMAKE_BUILD_TYPE=Debug 
CMake Error: CMake was unable to find a build program corresponding to "Ninja".  CMAKE_MAKE_PROGRAM is not set.  You probably need to select a different build tool.
-- Configuring incomplete, errors occurred!
make: *** [Makefile:156: out/clang/Debug/build.ninja] エラー 1

Ninjaが必要らしいが、dnfのepelリポジトリにも無い

ソースからビルドしてみる。詳細はgithub

# git clone https://github.com/ninja-build/ninja.git
Cloning into 'ninja'...
remote: Enumerating objects: 13476, done.
remote: Counting objects: 100% (369/369), done.
remote: Compressing objects: 100% (222/222), done.
remote: Total 13476 (delta 266), reused 147 (delta 147), pack-reused 13107 (from 6)
Receiving objects: 100% (13476/13476), 5.12 MiB | 1.82 MiB/s, done.
Resolving deltas: 100% (9425/9425), done.
# cmake -Bbuild-cmake ※ビルド事前設定のオプションらしい -DBUILD_TESTING=OFF付加でユニットテスト無効も可
-- The CXX compiler identification is GNU 11.5.0
-- Detecting CXX compiler ABI info
-- Detecting CXX compiler ABI info - done
-- Check for working CXX compiler: /usr/bin/c++ - skipped
-- Detecting CXX compile features
-- Detecting CXX compile features - done
-- IPO / LTO enabled
-- Performing Test flag_no_deprecated
-- Performing Test flag_no_deprecated - Success
-- Looking for ppoll
-- Looking for ppoll - found
CMake Warning at CMakeLists.txt:82 (message):
  re2c 2 or later was not found; changes to src/*.in.cc will not affect your
  build.


-- Looking for fork
-- Looking for fork - found
-- Looking for pipe
-- Looking for pipe - found
-- Could NOT find GTest (missing: GTEST_LIBRARY GTEST_INCLUDE_DIR GTEST_MAIN_LIBRARY) 
-- The C compiler identification is GNU 11.5.0
-- Detecting C compiler ABI info
-- Detecting C compiler ABI info - done
-- Check for working C compiler: /usr/bin/cc - skipped
-- Detecting C compile features
-- Detecting C compile features - done
-- Found Python: /usr/bin/python3.9 (found version "3.9.21") found components: Interpreter 
-- Performing Test CMAKE_HAVE_LIBC_PTHREAD
-- Performing Test CMAKE_HAVE_LIBC_PTHREAD - Success
-- Found Threads: TRUE  
-- Configuring done (10.9s)
-- Generating done (0.2s)
-- Build files have been written to: /root/ninja/build-cmake
# cmake --build build-cmake
[  1%] Building CXX object CMakeFiles/libninja-re2c.dir/src/depfile_parser.cc.o
[  2%] Building CXX object CMakeFiles/libninja-re2c.dir/src/lexer.cc.o
[  2%] Built target libninja-re2c
[  3%] Building CXX object CMakeFiles/libninja.dir/src/build_log.cc.o
[  5%] Building CXX object CMakeFiles/libninja.dir/src/build.cc.o
[  6%] Building CXX object CMakeFiles/libninja.dir/src/clean.cc.o
[  7%] Building CXX object CMakeFiles/libninja.dir/src/clparser.cc.o
[  8%] Building CXX object CMakeFiles/libninja.dir/src/dyndep.cc.o
[ 10%] Building CXX object CMakeFiles/libninja.dir/src/dyndep_parser.cc.o
[ 11%] Building CXX object CMakeFiles/libninja.dir/src/debug_flags.cc.o
[ 12%] Building CXX object CMakeFiles/libninja.dir/src/deps_log.cc.o
[ 14%] Building CXX object CMakeFiles/libninja.dir/src/disk_interface.cc.o
[ 15%] Building CXX object CMakeFiles/libninja.dir/src/edit_distance.cc.o
[ 16%] Building CXX object CMakeFiles/libninja.dir/src/elide_middle.cc.o
[ 17%] Building CXX object CMakeFiles/libninja.dir/src/eval_env.cc.o
[ 19%] Building CXX object CMakeFiles/libninja.dir/src/graph.cc.o
[ 20%] Building CXX object CMakeFiles/libninja.dir/src/graphviz.cc.o
[ 21%] Building CXX object CMakeFiles/libninja.dir/src/json.cc.o
[ 23%] Building CXX object CMakeFiles/libninja.dir/src/line_printer.cc.o
[ 24%] Building CXX object CMakeFiles/libninja.dir/src/manifest_parser.cc.o
[ 25%] Building CXX object CMakeFiles/libninja.dir/src/metrics.cc.o
[ 26%] Building CXX object CMakeFiles/libninja.dir/src/missing_deps.cc.o
[ 28%] Building CXX object CMakeFiles/libninja.dir/src/parser.cc.o
[ 29%] Building CXX object CMakeFiles/libninja.dir/src/real_command_runner.cc.o
[ 30%] Building CXX object CMakeFiles/libninja.dir/src/state.cc.o
[ 32%] Building CXX object CMakeFiles/libninja.dir/src/status_printer.cc.o
[ 33%] Building CXX object CMakeFiles/libninja.dir/src/string_piece_util.cc.o
[ 34%] Building CXX object CMakeFiles/libninja.dir/src/util.cc.o
[ 35%] Building CXX object CMakeFiles/libninja.dir/src/version.cc.o
[ 37%] Building CXX object CMakeFiles/libninja.dir/src/subprocess-posix.cc.o
[ 37%] Built target libninja
[ 38%] Generating build/browse_py.h
[ 39%] Building CXX object CMakeFiles/ninja.dir/src/ninja.cc.o
[ 41%] Building CXX object CMakeFiles/ninja.dir/src/browse.cc.o
[ 42%] Linking CXX executable ninja
[ 42%] Built target ninja
[ 43%] Building CXX object _deps/googletest-build/googletest/CMakeFiles/gtest.dir/src/gtest-all.cc.o
[ 44%] Linking CXX static library ../../../lib/libgtest.a
[ 44%] Built target gtest
[ 46%] Building CXX object CMakeFiles/ninja_test.dir/src/build_log_test.cc.o
[ 47%] Building CXX object CMakeFiles/ninja_test.dir/src/build_test.cc.o
[ 48%] Building CXX object CMakeFiles/ninja_test.dir/src/clean_test.cc.o
[ 50%] Building CXX object CMakeFiles/ninja_test.dir/src/clparser_test.cc.o
[ 51%] Building CXX object CMakeFiles/ninja_test.dir/src/depfile_parser_test.cc.o
[ 52%] Building CXX object CMakeFiles/ninja_test.dir/src/deps_log_test.cc.o
[ 53%] Building CXX object CMakeFiles/ninja_test.dir/src/disk_interface_test.cc.o
[ 55%] Building CXX object CMakeFiles/ninja_test.dir/src/dyndep_parser_test.cc.o
[ 56%] Building CXX object CMakeFiles/ninja_test.dir/src/edit_distance_test.cc.o
[ 57%] Building CXX object CMakeFiles/ninja_test.dir/src/elide_middle_test.cc.o
[ 58%] Building CXX object CMakeFiles/ninja_test.dir/src/explanations_test.cc.o
[ 60%] Building CXX object CMakeFiles/ninja_test.dir/src/graph_test.cc.o
[ 61%] Building CXX object CMakeFiles/ninja_test.dir/src/json_test.cc.o
[ 62%] Building CXX object CMakeFiles/ninja_test.dir/src/lexer_test.cc.o
[ 64%] Building CXX object CMakeFiles/ninja_test.dir/src/manifest_parser_test.cc.o
[ 65%] Building CXX object CMakeFiles/ninja_test.dir/src/missing_deps_test.cc.o
[ 66%] Building CXX object CMakeFiles/ninja_test.dir/src/ninja_test.cc.o
[ 67%] Building CXX object CMakeFiles/ninja_test.dir/src/state_test.cc.o
[ 69%] Building CXX object CMakeFiles/ninja_test.dir/src/string_piece_util_test.cc.o
[ 70%] Building CXX object CMakeFiles/ninja_test.dir/src/subprocess_test.cc.o
[ 71%] Building CXX object CMakeFiles/ninja_test.dir/src/test.cc.o
[ 73%] Building CXX object CMakeFiles/ninja_test.dir/src/util_test.cc.o
[ 74%] Linking CXX executable ninja_test
[ 74%] Built target ninja_test
[ 75%] Building CXX object CMakeFiles/build_log_perftest.dir/src/build_log_perftest.cc.o
[ 76%] Linking CXX executable build_log_perftest
[ 76%] Built target build_log_perftest
[ 78%] Building CXX object CMakeFiles/canon_perftest.dir/src/canon_perftest.cc.o
[ 79%] Linking CXX executable canon_perftest
[ 79%] Built target canon_perftest
[ 80%] Building CXX object CMakeFiles/clparser_perftest.dir/src/clparser_perftest.cc.o
[ 82%] Linking CXX executable clparser_perftest
[ 82%] Built target clparser_perftest
[ 83%] Building CXX object CMakeFiles/depfile_parser_perftest.dir/src/depfile_parser_perftest.cc.o
[ 84%] Linking CXX executable depfile_parser_perftest
[ 84%] Built target depfile_parser_perftest
[ 85%] Building CXX object CMakeFiles/elide_middle_perftest.dir/src/elide_middle_perftest.cc.o
[ 87%] Linking CXX executable elide_middle_perftest
[ 87%] Built target elide_middle_perftest
[ 88%] Building CXX object CMakeFiles/hash_collision_bench.dir/src/hash_collision_bench.cc.o
[ 89%] Linking CXX executable hash_collision_bench
[ 89%] Built target hash_collision_bench
[ 91%] Building CXX object CMakeFiles/manifest_parser_perftest.dir/src/manifest_parser_perftest.cc.o
[ 92%] Linking CXX executable manifest_parser_perftest
[ 92%] Built target manifest_parser_perftest
[ 93%] Building CXX object _deps/googletest-build/googlemock/CMakeFiles/gmock.dir/src/gmock-all.cc.o
[ 94%] Linking CXX static library ../../../lib/libgmock.a
[ 94%] Built target gmock
[ 96%] Building CXX object _deps/googletest-build/googlemock/CMakeFiles/gmock_main.dir/src/gmock_main.cc.o
[ 97%] Linking CXX static library ../../../lib/libgmock_main.a
[ 97%] Built target gmock_main
[ 98%] Building CXX object _deps/googletest-build/googletest/CMakeFiles/gtest_main.dir/src/gtest_main.cc.o
[100%] Linking CXX static library ../../../lib/libgtest_main.a
[100%] Built target gtest_main
#

うまくいったみたいなのでインスト

# cmake --install ./build-cmake/
-- Install configuration: ""
-- Up-to-date: /usr/local/include
-- Installing: /usr/local/include/gmock
-- Installing: /usr/local/include/gmock/gmock-actions.h
-- Installing: /usr/local/include/gmock/gmock-cardinalities.h
-- Installing: /usr/local/include/gmock/gmock-function-mocker.h
-- Installing: /usr/local/include/gmock/gmock-matchers.h
-- Installing: /usr/local/include/gmock/gmock-more-actions.h
-- Installing: /usr/local/include/gmock/gmock-more-matchers.h
-- Installing: /usr/local/include/gmock/gmock-nice-strict.h
-- Installing: /usr/local/include/gmock/gmock-spec-builders.h
-- Installing: /usr/local/include/gmock/gmock.h
-- Installing: /usr/local/include/gmock/internal
-- Installing: /usr/local/include/gmock/internal/custom
-- Installing: /usr/local/include/gmock/internal/custom/README.md
-- Installing: /usr/local/include/gmock/internal/custom/gmock-generated-actions.h
-- Installing: /usr/local/include/gmock/internal/custom/gmock-matchers.h
-- Installing: /usr/local/include/gmock/internal/custom/gmock-port.h
-- Installing: /usr/local/include/gmock/internal/gmock-internal-utils.h
-- Installing: /usr/local/include/gmock/internal/gmock-port.h
-- Installing: /usr/local/include/gmock/internal/gmock-pp.h
-- Installing: /usr/local/lib64/libgmock.a
-- Installing: /usr/local/lib64/libgmock_main.a
-- Installing: /usr/local/lib64/pkgconfig/gmock.pc
-- Installing: /usr/local/lib64/pkgconfig/gmock_main.pc
-- Installing: /usr/local/lib64/cmake/GTest/GTestTargets.cmake
-- Installing: /usr/local/lib64/cmake/GTest/GTestTargets-noconfig.cmake
-- Installing: /usr/local/lib64/cmake/GTest/GTestConfigVersion.cmake
-- Installing: /usr/local/lib64/cmake/GTest/GTestConfig.cmake
-- Up-to-date: /usr/local/include
-- Installing: /usr/local/include/gtest
-- Installing: /usr/local/include/gtest/gtest-assertion-result.h
-- Installing: /usr/local/include/gtest/gtest-death-test.h
-- Installing: /usr/local/include/gtest/gtest-matchers.h
-- Installing: /usr/local/include/gtest/gtest-message.h
-- Installing: /usr/local/include/gtest/gtest-param-test.h
-- Installing: /usr/local/include/gtest/gtest-printers.h
-- Installing: /usr/local/include/gtest/gtest-spi.h
-- Installing: /usr/local/include/gtest/gtest-test-part.h
-- Installing: /usr/local/include/gtest/gtest-typed-test.h
-- Installing: /usr/local/include/gtest/gtest.h
-- Installing: /usr/local/include/gtest/gtest_pred_impl.h
-- Installing: /usr/local/include/gtest/gtest_prod.h
-- Installing: /usr/local/include/gtest/internal
-- Installing: /usr/local/include/gtest/internal/custom
-- Installing: /usr/local/include/gtest/internal/custom/README.md
-- Installing: /usr/local/include/gtest/internal/custom/gtest-port.h
-- Installing: /usr/local/include/gtest/internal/custom/gtest-printers.h
-- Installing: /usr/local/include/gtest/internal/custom/gtest.h
-- Installing: /usr/local/include/gtest/internal/gtest-death-test-internal.h
-- Installing: /usr/local/include/gtest/internal/gtest-filepath.h
-- Installing: /usr/local/include/gtest/internal/gtest-internal.h
-- Installing: /usr/local/include/gtest/internal/gtest-param-util.h
-- Installing: /usr/local/include/gtest/internal/gtest-port-arch.h
-- Installing: /usr/local/include/gtest/internal/gtest-port.h
-- Installing: /usr/local/include/gtest/internal/gtest-string.h
-- Installing: /usr/local/include/gtest/internal/gtest-type-util.h
-- Installing: /usr/local/lib64/libgtest.a
-- Installing: /usr/local/lib64/libgtest_main.a
-- Installing: /usr/local/lib64/pkgconfig/gtest.pc
-- Installing: /usr/local/lib64/pkgconfig/gtest_main.pc
-- Installing: /usr/local/bin/ninja

とんでもない数

ninja --version
1.13.0.git

一応インストできたっぽい

ところが先のtestスイートの実行がfailする。あきらめてtest/run-tests.py


[apache]パスに.を含むurl

.backupとか見せたくないフォルダとかファイルを個別に.htaccessを作って書くのも面倒なんで

apacheのconfファイルに

## フルパス名にドットで始まるディレクトリィやファイルはブラウザから禁止
  <Directory ~ "\/\..+\/">
    Require all denied
  </Directory>
  <Files ~ "\/\..+\/">
    Require all denied
  </Files>
## .

って書くのはうまくいかないかな?matchなんで正規表現なんでディレクトリィやファイルのフルパス名のどこかに「.で始まる」ディレクトリィがあったらブラウザから禁止にできたっぽい。

ただ、

apacheでは短いパスでいくら禁止しても

そこから続く長いパスでRequireしたら通ってしまうが

単に合致したパターンの長さで判定してないとは「断定しにくい」・・・

何とも(判らん

## フルパス名にドットで始まるディレクトリィやファイルは外部から禁止
  <Directory ~ "\/\..+\/">
    Require all denied
    Require ip 192.168.xxx.xxx/24
  </Directory>
  <Files ~ "\/\..+\/">
    Require all denied
    Require ip 192.168.xxx.xxx/24
  </Files>
## .

と書き加えてreloadしたらLANから見えるので効果はあるっぽい。


[xterm.js]ssh接続その4

段々複雑になってきたので

xterm.jsの画面からは

  1. 画面からWebSocketで何か送信する
    • {
      • ssh : {
        • logon : {
          • username : xxxx
          • etc.
    • }…}
  2. ホスト側で受信
  3. JSONデータをアドオンのエイリアス(ssh)で配分する
    • { ssh : ・・・
    • sshエイリアスなアドオンのjsonRequestを呼び出す
  4. アドオンは受け取ったJSONデータから機能を実行する
    • { logon : ・・・
    • 処理名(logon)を読み取ってlogon処理を実行する
    • logon処理
      • { username : xxxx, …}
  5. 処理名が何か出力したらWebSocketで返信する

にすると後付けが楽な気がしたので、NodeJsで動く部分をアドオン化してみたら更に複雑になった。

├── package.json
├── package-lock.json
├── index.js
├── lock_file.js
├── tree.txt
├── web_socket_entity.js
└── addon
  ├── package.json
  ├── base_addon.js
  ├── js_yaml
  │├── package.json
  │└── js_yaml.js
  └── ssh_client
    ├── package.json
    ├── package-lock.json
    └── ssh_client.js

アドオンフォルダ(./addon)にプロジェクトごとコピーする方式。

AddonManagerのsetupで、アドオンフォルダ(./addon)の中のフォルダにある

package.jsonのmainかexportをからモジュールのjsファイルを見つけて

エイリアス付きでtypeListsにリストアップするダケなのにとっても長い。

/**
 * アドオンマネジャクラス
 */
export class AddonManager extends BaseAddon {
 ・・・省略・・・
  /**
   * リスト
   */
  typeLists = {};
 ・・・省略・・・
  /**
   * コンストラクタ
   */
  constructor() {
    super();
  };
  /**
   * ./addonディレクトリィのパッケージを検索
   * @param (*) pathAddonsDir
   */
  setup = (pathAddonsDir, allAddonInfo) => {
    this.allAddonInfo = allAddonInfo;
    return new Promise((resolve, reject) => {
      fs.readdir(pathAddonsDir, { encoding: 'utf-8', withFileTypes: true, recursive: false },
        (err, dirents) => {
          /**
           * error
           */
          if (err) {
            console.error(err);
            reject(err);
            return;
          }
          /**
           * ディレクトリィのみに絞込む
           */
          dirents = dirents.filter((d) => d.isDirectory());
          /**
           * とりあえず配列分ループ
           */
          const arP = dirents.map((dirent) => {
            return new Promise((resolve, reject) => {
              const addonPath = `${pathAddonsDir}/${dirent.name}`;
              console.log(addonPath);
              // dirent配下のpackage.jsonを読む
              const packageJsonPathname = `${addonPath}/package.json`;
              const packageJsonText = fs.readFileSync(packageJsonPathname);
              const packageJson = JSON.parse(packageJsonText);
              const mainFile = packageJson.main || packageJson.exports;
              if (mainFile !== undefined) {
                const mainFilePathname = `${addonPath}/${mainFile}`;
                import(mainFilePathname)
                  .then((module) => {
                    // 動的に読み込まれたモジュール
                    const addonModule = new module.default;
                    // アドオンリストに追加
                    this.setAddonList(addonModule.addonAlias, addonModule);
                    resolve(true);
                  })
                  .catch((ex) => {
                    console.error(ex);
                    reject(ex);
                  });
              } else {
                console.error(`addonSetup : ${packageJsonPathname} not found main or exports`);
              }
            });
          });
          Promise.all(arP)
            .then((values) => {
              resolve(true);
            });
        }
        // end of for (const dirent of dirents)
      );
    });
  };
 ・・・省略・・・
};

アドオンを呼び出す時は

AddonManager::getAddonObject({アドオンのエイリアス})でオブジェクトを取得

  /**
   * アドオン・オブジェクトを取得
   * @param {*} alias 
   * @returns addon
   */
  getAddonObject = (alias) => {
    const addonInfo = this.typeLists['addon'][alias];
    if (addonInfo) {
      const object = new addonInfo.constructor(this.allAddonInfo[alias]);
      return object;
    } else {
      return undefined;
    }
  };

画面からの要求を{アドオンのオブジェクト}::jsonRequest(WebSocket, json)から

アドオンオブジェクトを作成し実行させている。

  /**
   * JSONリクエスト処理
   * @param {*} webSocketEntity 
   * @param {*} json 
   * @param {*} addonObjectList 
   */
  jsonRequest = (webSocketEntity, json, addonObjectList) => {
    const addonModules = this.typeLists['addon'];
    for (const alias in json) {
      const addon = addonObjectList[alias] ?? this.getAddonObject(alias);
      if (!addonObjectList[alias]) { addonObjectList[alias] = addon; }
      if (addon) {
        try {
          addon.request(webSocketEntity, json[alias]);
        } catch (ex) {
          console.log(`AddonManager::jsonRequest : unknown addon alias  '${alias}'`);
        }
      } else {
        console.log(`AddonManager::jsonRequest : unknown addon alias  '${alias}'`);
      }
    }
  };

レスポンスはアドオンオブジェクトにWebSocket宛に送信してもらった。

  /**
   * クライアントに返信する処理
   * @param {string} type 
   * @param {string} commandName 
   * @param {any} data 
   */
  sendClient = (type, commandName, data) => {
    //console.log(`${commandName} : ${data}`);
    const responce = {};
    responce[type] = data;
    const blob = new Blob([JSON.stringify(responce)], { type: "application/json" });
    this.connect.send(blob);
  };

やっと画面側もtype毎に処理を分けないといけない事に気が付く。

めんど


[node.js]node –inspect-wait

リモートホストで動くnode.jsのアプリ(index.js)をPCのchromeからデバッグできた。

# node --inspect-wait {ソース名}

で実行しchrome待ちになってるけど、Chromeの「chrome://inspect/」 のページの

Discover network targetsの【Configure】ボタンを押して

{リモートホストのIPアドレス}:9229

を追記しても、

Remote Target #{リモートホストのIPアドレス}

に index.js が表示されない。

man node でオプションを調べてみると

--inspect-wait=[host:]port
        Activate inspector on host:port and wait for debugger to be attached.

[host:]port ってIPアドレスやポートを指定できるんだ。

# node --inspect-wait={自分のIPアドレス}:{chromeと通信するポート番号} {ソース名}

で、chromeのDevToolsで、ファイル選択でindex.jsを選ぶと普通にデバッグできた。

但し、これはリモートホスト側でポート開放必須でinspectも何でも出来る様なので、

SSLでポートフォワードする方法の方がよさそう。

> ssh -L 9229:localhost:9229 {ユーザ名}@{リモートホストのIPアドレス}
$ node --inspect-wait index.js

これでChromeでデバッグしながら、ポートを解放せずにsshでソース修正ができるから結構使い道がありそうだし、chrome操作さけなら「うっかりソースのバグを修正していまう」コトも無い(ハズ

to 管理者:ポート開放して

from 管理者:無理

ってありそうだし(笑

最近のWindowsはkey-genできるしsshできるし便利になったね。(大笑

あ、BATファイルにすればいいなぁ

cmd /C ssh -L 9229:localhost:9229 {ユーザ名}@{リモートホストのIPアドレス}

あれ無限ループ?

ファイル名が悪かった(再起してた

cmd /C ssh -L 9229:localhost:9229 {ユーザ名}@{リモートホストのIPアドレス}

これでポートも繋がりすぐ node –inspect-wait index.js できる。

メデタシメデタシ

ps.2025/4/11

大元ネタはココらしい。


[xterm.js]ssh接続その3

WebSocketをxtermのアドオン@xterm/addon-attachに渡してるけど、このままではログをちょっとみたいとかできない。

@xterm/addon-attachから送信されるデータがいつもUint8Arrayなので、挟むコマンドはテキストで送ればいいのかと思ったら、クライアント側でstring, ArrayBuffer, Blobのどれをsendしようが、サーバ側にはUint8Arrayとして引き渡されていたので、サーバ側はいつもJSONデータが渡ってくる前提でコード。

/**
 * WebSocketクライアント(xterm.js)からメッセージ受信時の処理
 */
ws.on('message', async (event) => {
  // JSON.stringify()でテキストで送信しているハズ
  const textJson = await new Response(event).text();
  // JSONに成~れ!
  try {
    const json = JSON.parse(textJson);
    // JSONに成った!
    // sshかな?
    if (json.ssh) {
      if (typeof json.ssh === 'string') {
        console.log(`resv ssh text : '${json.ssh}'`);
        stream.write(json.ssh);
      } else if (json.ssh instanceof Uint8Array) {
        // いつものUint8Array
        const text = new TextDecoder().decode(json.ssh);
        console.log(`resv ssh binary : '${text}'`);
        stream.write(json.ssh);
      } else {
        console.log(`resv ssh unknown type[${typeof json.ssh}] : '${json.ssh}'`);
      }
    } else if (json.{その他1}) {
      // {その他1}かな?
      const resultText = {その他1}(json.{その他1});
      console.log(`{その他1}('${json.{その他1}}')\n='${resultText}'`);
      // 結果をJSONに置き換えて
      const responce = {
        {その他1}: resultText,
      };
      // 送信
      const blob = new Blob([JSON.stringify(responce)], { type: "application/json" });
      ws.send(blob);
    } else if (json.{その他2}) {
      ・・・省略・・・
    } else if (json.{その他n}) {
      ・・・ほぼ{その他1}と似た感じ
    } else  {
      // しらないコマンド
    }
  } catch (ex) {
    // 私はJSONに成れないのか!
    console.log(`resv not json's text : ex : '${ex}'`);
  }
});

クライアント側は、WebSocketのmessageメソッドに

webSocket.addEventListener("message", async (event) => {
 ・・・
  preventDefault();
}, { passive: false });

しても、xtermjs画面にデータを表示してしまう。

仕方が無い。

@xterm/addon-attachを外して・・・

自前でWebSocketを送受信する。(前途多難そう

/**
 * WebSocketの処理 ***************************
 */
/**
 * WebSocketのmessageイベント処理
 */
webSocket.addEventListener("message", async (event) => {
  // テキストにする
  const textJson = await new Response(event.data).text();
  // JSONに成~れ
  try {
    const json = JSON.parse(textJson);
    // 内容で分岐
    if (json.ssh) {
      const s = json.ssh;
      terminal.write("string" == typeof s ? s : new Uint8Array(s));
    } else if (json.{その他1}) {
      //  {その他1}のレスポンス
      console.log(`{その他1}='${json.{その他1}}'`);
    } else if (json.{その他2}) {
・・・
    } else if (json.{その他n}) {
      //  {その他n}のレスポンス
      console.log(`{その他n}='${json.{その他n}}'`);
    } else {
       // 知らないコマンド
    }
  } catch (ex) {
    // JSONに成れなかった
  }
});
/**
 * WebSocketのcloseイベント処理
 */
webSocket.addEventListener("close", ((event) => {
  terminal.write('*** disconnection ***');
  console.log('*** disconnection ***');
}));
/**
 * WebSocketのerrorイベント処理
 */
webSocket.addEventListener("error", ((event) => {
  terminal.write('*** socket error ***');
  console.error(`socket error : ${event}`);
}));
/**
 * Terminalのイベント処理
 */
/**
 * Terminalのdataイベント処理
 */
terminal.onData((event) => {
  // sshに送信するJSONに変換
  const msg = {
    ssh: event,
  };
  // テキストに展開しBlobで送信
  const blob = new Blob([JSON.stringify(msg)], { type: "application/json" });
  webSocket.send(blob);
});
/**
 * Terminalのbinaryイベント処理
 */
terminal.onBinary((event) => {
// 呼ばれてないので省略
});

@xterm/addon-attachを代行する処理は、

WebSocketのmessageの処理は長いけど(独自コードが多い

xtermjsのデータを送信するのは短くてよかった。

本当は色々チェックが必要なんだろうけど。(ま、いいか


[xterm.js]ssh接続その2

リモートホストとPCの両方をVScodeで観れるようになると色々注意されるのが気になってきたので修正

1.CommonJSモジュールをESモジュールに変えてみる

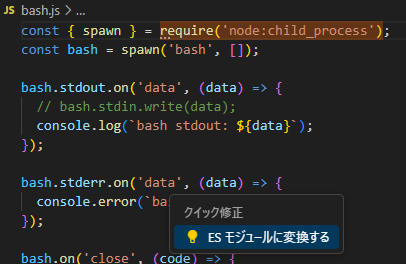
ソースの…が気になるので見てみると

云うのでクイックフィックスしてみると

と修正候補のESモジュールに変換するをクリック。

それはそれでもいいけどね

2.負傷1

別のソースで同様に変換すると

import { WebSocket } from 'ws';
・・・
const wss = new WebSocket.Server({ port: sshInfo.wsport });

WebSocket.Server にコンストラクタ無いっすエラー

ググって他人のソースを検索してみたら

import { WebSocketServer } from 'ws';
・・・
const wss = new WebSocketServer({ port: sshInfo.wsport });

と書いていたので真似た。

3.負傷2

クイックフィックスが一気に書き換えて実行すると

別に{}を取ればいいだけなんだが

import fs from 'fs';

で実行すると

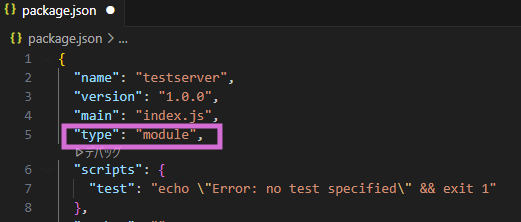
はいはいpackage.jsonもESモジュール宣言ね。

ps.2025/4/8

ブラウザ用のjsファイルもESモジュールにできるみたいだ。

しかし、TypeScriptで書いたモジュールのjsファイルは

同名の.d.tsファイルを作り、export宣言をしても、ブラウザがエラってしまう。

inportmapを作ってもダメ。


[xterm.js]ssh2接続

ブラウザとシェルはWebSocketで非同期に相互に(つまり自分勝手)に通信する。

node.jsでspawnすればシェルと繋がるけど、改行入力で1行入力(readline)っぽくシェルがやってくれると思ってたら、改行しても応答無しstdinストリームを閉じまで入力したコマンドを実行する気配が無かった、BackSpaceもそのまま渡ってしまう・・・

どうやらsshサービスが頑張ってる様だ。

node.jsからシェル起動は諦めて、ssh2サービスに繋ぐことにする。

1.WebSocketサーバーの作成

# mkdir testServer
# cd testServer
# npm init
・・・・・
# npm install ssh2            ※SSH2パッケージ
# npm install ws              ※WebSocketパッケージ
const WebSocket = require('ws');
const { sshTerm } = require('./sshTerm.js');
// SSH接続情報
const sshInfo = {
user      : '{SSHのログイン・ユーザ名}',
password  : '{SSHのログイン・パスワード}' {または} privateKey: require('fs').readFileSync('/PATH/id_rsa') ,
ipaddress : '{SSHのホストIPアドレス}',
sshport   : {SSHのポート番号},
wsport    : {WebSocketのポート番号},
httpport  : {apacheのポート番号},
httpath   : '{urlのパス}',
};
// ポート${sshInfo.wsport}でWebSocketサーバーを作成
const wss = new WebSocket.Server({ port: sshInfo.wsport });
// 案内文
console.log(`ssh ready, URL http://${sshInfo.ipaddress}:${sshInfo.httpport}/${sshInfo.httpath}`);
// WebSocketクライアント(xterm.js)接続時の処理
wss.on('connection', function connection(ws) {
  const env = process.env;
  console.log('connection WebSocket client.');
   const bash = sshTerm(ws, sshInfo);
});

passwordかprivateKeyかprivateKeyPathのいづれかを指定できる。

const { Client } = require('ssh2');
// SSH接続を確立
const sshTerm = async (ws, sshInfo) => {
  const commandName = 'bash';
  const conn = new Client();
  conn.on('ready', () => {
    // ssh2接続準備完了
    console.log('Client :: ready');
    // shell対応
    conn.shell((err, stream) => {
      if (err) throw err;
      stream.on('close', () => {
        // エラった時
        if (code !== 0) {
          console.log(`${commandName} process exited with code : ${code}.`);
        } else {
          console.log(`${commandName} process exited.`);
        }
        ws.send(`disconnected.`);
        conn.end();
      }).on('data', (data) => {
        // ssh2からデータが送られた時の処理
        console.log(`${commandName} : ${data}`);
        data = data.toString().replaceAll('\n', '\r\n');
        ws.send(data);
      });      
      // WebSocketクライアント(xterm.js)からメッセージ受信時の処理
      ws.on('message', async (message) => {
        console.log('受信したメッセージ: %s', message);
        stream.write(message);
      });      
      // WebSocketクライアント(xterm.js)クライアントから切断された時の処理
      ws.on('close', function close() {
        console.log('クライアントとの接続が切断');
        stream.end();
      });
      // Ctrl+Cで止められた時の処理      
      process.on('SIGHUP', ()=> {
        console.log('Got SIGHUP. ');
        stream.end();
        console.log('クライアントの接続をパージ');
        ws.close();
     });
     // 以上
    });
  }).connect({
    host: sshInfo.ipaddress,
    port: sshInfo.sshport,
    username: sshInfo.user,
    password: sshInfo.password {または} privateKey: sshInfo.privateKey,
  });
};
exports.sshTerm = sshTerm;
  • privateKey
    • ‘~/.ssh/id_rsa` の様な ‘~’ を使うとopenエラー。
      • 代用はprocess.env[‘HOME’]
  • privateKeyPath
    • エラってしまう。

testServerプロジェクトの雰囲気

  • testServer
    • index.html
    • sshTerm.js
      • node_modules
        • ssh2
        • ws

ここで、

# node index.js

でサーバー側の準備は終わり。

2.WebSocketクライアントの作成

クライアントはapacheのhtmlの下にtestディレクトリィを作りxtermのアドオン等を追加する。

# cd /var/www/html
# mkdir test
# cd test
# npm init
・・・
# npm install @xterm/xterm
# npm install @xterm/addon-web-links
# npm install @xterm/addon-attach
# npm install @xterm/addon-clipboard
# npm install @xterm/addon-fit
# npm install @xterm/addon-image
# npm install @xterm/addon-web-links
# npm install @xterm/addon-webgl

必要なのは、node_modules/@xterm下の cssファイル、jsファイル、mapファイルだけなので不要なファイルは削除する。

index.htmlにアドオンのファイルを追記。

<!doctype html>
  <html lang="ja">
    <meta charset="UTF-8">
    <title>xterm.js test page</title>
    <head>
      <link rel="stylesheet" href="node_modules/@xterm/xterm/css/xterm.css" />
      <script src="node_modules/@xterm/xterm/lib/xterm.js"></script>
      <script src="node_modules/@xterm/addon-web-links/lib/addon-web-links.js"></script>
      <script src="node_modules/@xterm/addon-attach/lib/addon-attach.js"></script>
      <script src="node_modules/@xterm/addon-clipboard/lib/addon-clipboard.js"></script>
      <script src="node_modules/@xterm/addon-fit/lib/addon-fit.js"></script>
      <script src="node_modules/@xterm/addon-image/lib/addon-image.js"></script>
      <script src="node_modules/@xterm/addon-web-links/lib/addon-web-links.js"></script>
      <script src="node_modules/@xterm/addon-webgl/lib/addon-webgl.js"></script>
      <script src="test.js"></script>
    </head>
    <body>
      <div id="terminal"></div>
    </body>
  </html>

test.jsにもアドオンの初期化等を追記

// 初期化処理
const sshInfo = {
wsport    : {WebSocketのポート番号},
};
window.addEventListener('load', () => {
  const term = new Terminal();
  //
  term.open(document.getElementById('terminal'));
  term.write('Hello from \x1B[1;3;31mxterm.js\x1B[0m $ ');  
  // addon  
  // @xterm/addon-attach
  // initialization
  const webSocket = new WebSocket(`ws://${location.hostname}:${sshInfo.wsport}`);
  const attachAddon = new AttachAddon.AttachAddon(webSocket);
  term.loadAddon(attachAddon);
  // @xterm/addon-clipboard
  // initialization
  const clipboardAddon = new ClipboardAddon.ClipboardAddon();
  term.loadAddon(clipboardAddon);
  // @xterm/addon-fit
  // initialization
  const fitAddon = new FitAddon.FitAddon();
  term.loadAddon(fitAddon);
  fitAddon.fit();
  // @xterm/addon-image
  // customize as needed (showing addon defaults)
  const customSettings = {
    enableSizeReports: true,    // whether to enable CSI t reports (see below)
    pixelLimit: 16777216,       // max. pixel size of a single image
    sixelSupport: true,         // enable sixel support
    sixelScrolling: true,       // whether to scroll on image output
    sixelPaletteLimit: 256,     // initial sixel palette size
    sixelSizeLimit: 25000000,   // size limit of a single sixel sequence
    storageLimit: 128,          // FIFO storage limit in MB
    showPlaceholder: true,      // whether to show a placeholder for evicted images
    iipSupport: true,           // enable iTerm IIP support
    iipSizeLimit: 20000000      // size limit of a single IIP sequence
  }
  // initialization
  const imageAddon = new ImageAddon.ImageAddon(customSettings);
  term.loadAddon(imageAddon);
  // @xterm/addon-web-links
  term.loadAddon(new WebLinksAddon.WebLinksAddon());
  // @xterm/addon-webgl
  term.loadAddon(new WebglAddon.WebglAddon());
});

new ClipboardAddon.ClipboardAddon()とか変な書き方になってるのは

サンプルソースでは new ClipboardAddon() なので実行するとコンストラクタが無いエラーになる。

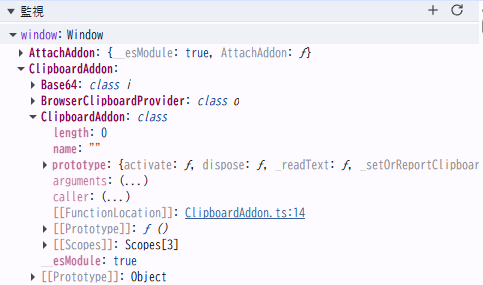
ブラウザのJavaScriptではグローバルな宣言は、windowオブジェクトにぶら下がるので、

Chromeの開発ツールの監視でwindow値を見ると ClipboardAddon が見つかる

見た感じではClipboardAddon オブジェクトにClipboardAddon クラスがぶら下がっている感じだったのであの様に new している。

多分、TypeScriptのコードをビルドしたソース(というかESModuleコード全般)をJavaScriptから利用するとexportsした名前の下にexportsしたい対象がブラ下がる様に見えるらしい。

/var/www/html/testプロジェクトの雰囲気

  • test
    • index.html
    • test.js
      • node_modules
        • (いっぱい)

後はブラウザから http://localhost/test/ を開く。

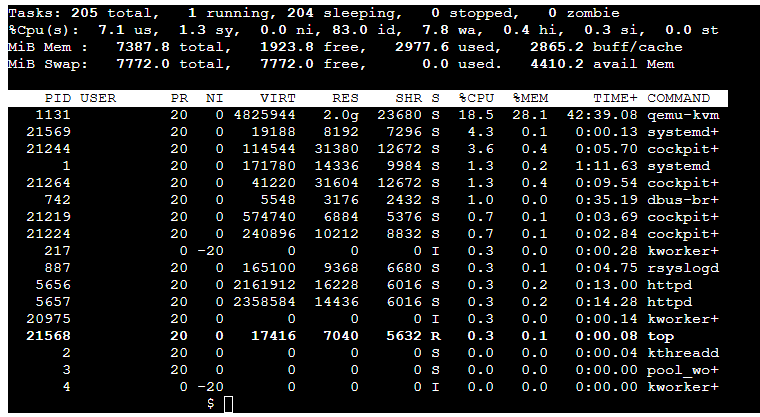
topコマンドやviコマンドも普通に使える。

ブラウザで複数のセッションを開けるけど、多人数で使うのは無理。

とても少ないコードでここまで動くのは大助かり。

もっとも

VisualStudioCodeのSSH接続でソース修正やデバッグができるので

もう不要と云えば不要だけどね。

ps.2025/4/9

アドオンがうまく動作していなかったけど、参考を見て紛れてるミスを訂正したらマウスホバーでリンク表示とかCtrl+クリックでジャンプ出来る様になった。


[podman]AlmaLinux9+apache

AlmaLinux9+apacheのイメージを作ってみる。

podmanの使い方としては、

  • mariaDBコンテナ
  • apacheコンテナ

とした方が良いかなと思うから。

FROM  almalinux:latest
RUN   dnf -y update
RUN   dnf -y install httpd
#COPY  httpd.conf /etc/httpd/conf/httpd.conf
RUN   systemctl enable httpd
#
RUN   dnf clean all;
EXPOSE 80 443
CMD [ "/sbin/init" ]

を作って

# podman build -t almalinux9_apache .
STEP 1/7: FROM almalinux:latest
STEP 2/7: RUN   dnf -y update
--> Using cache a2b577abfca6c6300e9f168092f69ba20ea7a88d6149f315be56de91a4380bf7
--> a2b577abfca6
STEP 3/7: RUN   dnf -y install httpd
Last metadata expiration check: 21:24:28 ago on Wed Apr  2 17:57:08 2025.
・・・
Installed:
  almalinux-logos-httpd-90.5.1-1.1.el9.noarch                                   
  apr-1.7.0-12.el9_3.x86_64                                                     
  apr-util-1.6.1-23.el9.x86_64                                                  
  apr-util-bdb-1.6.1-23.el9.x86_64                                              
  apr-util-openssl-1.6.1-23.el9.x86_64                                          
  httpd-2.4.62-1.el9_5.2.x86_64                                                 
  httpd-core-2.4.62-1.el9_5.2.x86_64                                            
  httpd-filesystem-2.4.62-1.el9_5.2.noarch                                      
  httpd-tools-2.4.62-1.el9_5.2.x86_64                                           
  libbrotli-1.0.9-7.el9_5.x86_64                                                
  mailcap-2.1.49-5.el9.noarch                                                   
  mod_http2-2.0.26-2.el9_4.1.x86_64                                             
  mod_lua-2.4.62-1.el9_5.2.x86_64                                               

Complete!
--> 76f7cccc93f3
STEP 4/7: RUN   systemctl enable httpd
Created symlink /etc/systemd/system/multi-user.target.wants/httpd.service → /usr/lib/systemd/system/httpd.service.
--> 8071a49560fc
STEP 5/7: RUN   dnf clean all;
26 files removed
--> 9cde52251b3b
STEP 6/7: EXPOSE 80 443
--> 91aa7de1ab1c
STEP 7/7: CMD [ "/sbin/init" ]
COMMIT almalinux9_apache
--> 1d4a7b70300c
Successfully tagged localhost/almalinux9_apache:latest
1d4a7b70300c7fda2a4dfea9dd5e02a5645a4e9236e326543838e9ffe3351af3

ではコンテナを作成

# podman run -d -it --name almalinux9_apache_contener_work \
 -p 80:80 \
 almalinux9_apache
603e81035435f7078243160754c72c621324151e3ccb0e1dd80d5f4d1e1362f0

ログも異常なし。

コンテナ内の

  • /etc/httpd/conf
  • /etc/httpd/conf.d
  • /var/www

を圧縮して取り出してホストの各保存ディレクトリィに展開しコンテナを作り直し

# podman run -d -it --name almalinux9_apache_contener \
 -p 8080:80 \ ※80:80だとエラるので8080
 -v '/{www保存ディレクトリィ※事前作成済}:/var/www' \
 -v '/{conf保存ディレクトリィ※事前作成済}:/etc/httpd/conf' \
 -v '/{conf.d保存ディレクトリィ※事前作成済}:/etc/httpd/conf.d' \
 almalinux9_apache
7b6fe5be65cedc24e4821f9edb2246ba7444d0f953d1b0185ded091083acae8a

# firewall-cmd --add-port=8080/tcp --permanent
# firewall-cmd --reload
# firewall-cmd --list-all ※設定内容の確認

これでホスト側で設定やコンテンツを編集しやすくなった(笑

# podman exec almalinux9_apache_contener systemctl reload httpd
# podman exec almalinux9_apache_contener systemctl restart httpd

は長いからコンテナの停止・起動でいいや


top